


🌟 Welcome to Our Spring Batch Processing Blog! 🚀
Ready to master batch processing with Spring Batch? Whether you're new to batch processing or a seasoned pro, join us as we explore Spring Batch from start to finish.
In this series, we'll cover everything you need to know to streamline your data processing workflows. Get ready for practical examples, best practices, and insights to elevate your batch processing skills.
Let's dive in and unleash the power of Spring Batch together! 🌐💼💡 Stay tuned for our first installment. Happy batching! 🎉👨💻
Introduction
Spring Batch is an open-source framework tailored for batch processing needs. It furnishes a plethora of reusable components such as the JobLauncher, JobRepository, Jobs, and Steps, facilitating the execution of repetitive tasks in a scalable and efficient manner. Whether the objective is to retrieve substantial data from a database or to process large datasets from CSV files, Spring Batch offers comprehensive solutions. It streamlines the retrieval, processing, and writing of data, ensuring seamless operations from source to destination.
Architecture
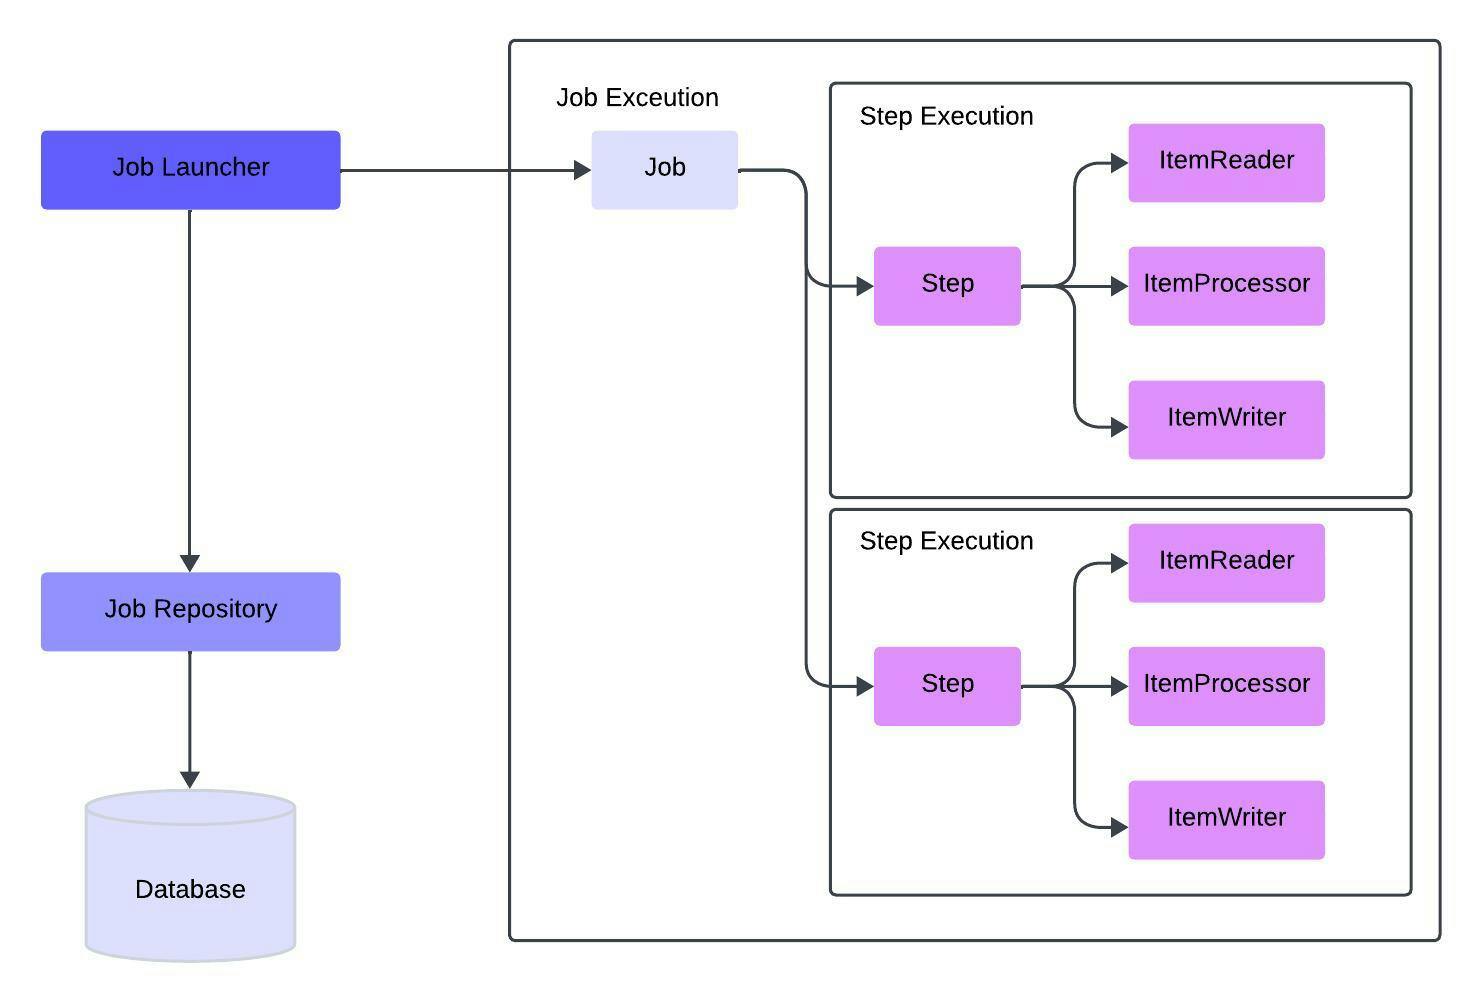
The architecture primarily comprises several components, including the Job Launcher, Job Repository, Job, Step, ItemReader, ItemProcessor, and ItemWriter.
At the outset, the JobLauncher is invoked by the JobScheduler, serving as the entry point to any batch operation.
Subsequently, the JobLauncher initializes the JobRepository, responsible for managing the Job and its constituent steps.
The JobLauncher also triggers the execution of the Job, which comprises a sequence of processes constituting batch processing operations. A Job may encompass one to many steps.
A Job may contain multiple steps, with each step executed sequentially, serving as a discrete unit of processing.
Each step is comprised of three primary components: the ItemReader, ItemProcessor, and ItemWriter.
The ItemReader retrieves data from the input source, be it a file or database, and forwards it for processing.
The ItemProcessor executes a series of operations prescribed for the data received from the ItemReader.
Finally, the ItemWriter is responsible for persisting the processed data, either into a database or a file, after processing is complete.
How the Batch information is stored?
The JobLauncher will proceed to register the JobInstance in the database via the JobRepository.
Subsequently, the JobLauncher will log the initiation of Job Execution in the database through the JobRepository.
The JobStep continuously updates the database with information regarding the number of steps, I/O operations, and the status of each step.
Upon completion of the Job, the JobLauncher updates the database to reflect the completion of JobExecution.
Development
Now, move to your favorite IDE or to the Spring Initializer and create a Spring boot Application with the following dependencies
Now, what are we gonna use?

To learn how to implement the Spring Batch we will be add some records from the CSV file to the database.
Model Layer
Here, we only require the entity since we are not requesting any input from the user, due to which create a Employee class in the package called model.entity .
Employee.java
package org.training.springbatchtutorial.model.entity;

import jakarta.persistence.Entity;
import jakarta.persistence.GeneratedValue;
import jakarta.persistence.GenerationType;
import jakarta.persistence.Id;
import lombok.AllArgsConstructor;
import lombok.Data;
import lombok.NoArgsConstructor;

@Entity
@Data
@AllArgsConstructor
@NoArgsConstructor
public class Employee {

    @Id
    @GeneratedValue(strategy = GenerationType.IDENTITY)
    private long employeeId;

    private String firstName;

    private String lastName;

    private String email;

    private String gender;

    private String contactNo;

    private String country;

    private String dateOfBirth;
}
Repository Layer
Now, we need the Repository interface since there is the need to add the records to the database. Create an interface EmployeeRepository in the package repository .
EmployeeRepository.java
package org.training.springbatchtutorial.repository;

import org.springframework.data.jpa.repository.JpaRepository;
import org.training.springbatchtutorial.model.entity.Employee;

public interface EmployeeRepository extends JpaRepository<Employee, Long> {
}
Configuration Layer
Now, in this layer we would be adding the configuration required to execute the batch. Here we will be defining the ItemRecoder, ItemProcessor and ItemWriter, also the Job the required steps to complete the Batch Processing. Create a class BatchConfiguration in the package called configuration .
BatchConfiguration.java
package org.training.springbatchtutorial.configurations;

import jakarta.transaction.TransactionManager;
import lombok.RequiredArgsConstructor;
import org.aspectj.apache.bcel.util.Repository;
import org.springframework.batch.core.Job;
import org.springframework.batch.core.Step;
import org.springframework.batch.core.job.builder.JobBuilder;
import org.springframework.batch.core.repository.JobRepository;
import org.springframework.batch.core.step.builder.StepBuilder;
import org.springframework.batch.item.data.RepositoryItemWriter;
import org.springframework.batch.item.file.FlatFileItemReader;
import org.springframework.batch.item.file.LineMapper;
import org.springframework.batch.item.file.mapping.BeanWrapperFieldSetMapper;
import org.springframework.batch.item.file.mapping.DefaultLineMapper;
import org.springframework.batch.item.file.transform.DelimitedLineTokenizer;
import org.springframework.context.annotation.Bean;
import org.springframework.context.annotation.Configuration;
import org.springframework.core.io.FileSystemResource;
import org.springframework.core.task.SimpleAsyncTaskExecutor;
import org.springframework.core.task.TaskExecutor;
import org.springframework.transaction.PlatformTransactionManager;
import org.training.springbatchtutorial.model.entity.Employee;
import org.training.springbatchtutorial.repository.EmployeeRepository;

@Configuration
@RequiredArgsConstructor
public class BatchConfiguration {

    private final EmployeeRepository employeeRepository;
    @Bean
    public FlatFileItemReader<Employee> reader() {

        FlatFileItemReader<Employee> itemReader = new FlatFileItemReader<>();
        itemReader.setResource(new FileSystemResource("src/main/resources/employee.csv"));
        itemReader.setName("readCsv");
        itemReader.setLinesToSkip(1);
        itemReader.setLineMapper(lineMapper());
        return itemReader;
    }

    private LineMapper<Employee> lineMapper() {

        DefaultLineMapper<Employee> lineMapper = new DefaultLineMapper<>();

        DelimitedLineTokenizer lineTokenizer = new DelimitedLineTokenizer();
        lineTokenizer.setDelimiter(",");
        lineTokenizer.setStrict(false);
        lineTokenizer.setNames("employeeId", "firstName", "lastName", "gender", "contactNo", "country", "dateOfBirth");

        BeanWrapperFieldSetMapper<Employee> fieldSetMapper = new BeanWrapperFieldSetMapper<>();
        fieldSetMapper.setTargetType(Employee.class);

        lineMapper.setLineTokenizer(lineTokenizer);
        lineMapper.setFieldSetMapper(fieldSetMapper);
        return lineMapper;
    }

    @Bean
    public CustomProcessor processor() {
        return new CustomProcessor();
    }
    @Bean
    public RepositoryItemWriter<Employee> writer() {
        RepositoryItemWriter<Employee> itemWriter = new RepositoryItemWriter<>();
        itemWriter.setRepository(employeeRepository);
        itemWriter.setMethodName("save");
        return itemWriter;
    }

    @Bean
    public Step createRecords(JobRepository jobRepository, PlatformTransactionManager transactionManager) {

        return new StepBuilder( "createRecords", jobRepository)
                .<Employee, Employee>chunk(10, transactionManager)
                .reader(reader())
                .writer(writer())
                .taskExecutor(taskExecutor())
                .build();
    }

    @Bean
    public Job runJob(JobRepository jobRepository, PlatformTransactionManager transactionManager) {

        return new JobBuilder("runJob", jobRepository)
                .flow(createRecords(jobRepository, transactionManager))
                .end().build();
    }

    @Bean
    public TaskExecutor taskExecutor() {

        SimpleAsyncTaskExecutor asyncTaskExecutor = new SimpleAsyncTaskExecutor();
        asyncTaskExecutor.setConcurrencyLimit(10);
        return asyncTaskExecutor;
    }
}
ItemReader Configuration:
Defines a
FlatFileItemReaderbean to read data from a CSV file (employee.csv) and map it toEmployeeobjects.Specifies the CSV file location, skips the header row, and configures the line mapper to map CSV columns to
Employeefields.
ItemProcessor Configuration:
- Defines a
CustomProcessorbean, presumably for custom processing logic. The implementation ofCustomProcessoris not provided in the code snippet.
- Defines a
ItemWriter Configuration:
- Defines a
RepositoryItemWriterbean to writeEmployeeobjects to a repository (presumably a database) using thesavemethod ofEmployeeRepository.
- Defines a
Step Configuration:
Defines a step named
createRecords, which represents a unit of work in the batch process.Specifies the reader, processor, writer, and task executor for the step.
Configures chunk-based processing with a chunk size of 10 and associates the step with a job repository and transaction manager.
Job Configuration:
Defines a job named
runJobthat includes thecreateRecordsstep.Ends the job configuration after adding the step.
Task Executor Configuration:
Defines a
TaskExecutorbean to execute batch processing tasks asynchronously.Configures a concurrency limit of 10, allowing up to 10 concurrent batch processing tasks.
Now, let's add the required database and batch configuration to the application.yml file:
server:
  port: 8082

spring:
  application:
    name: batch-processing-tutorial
  batch:
    jdbc:
      initialize-schema: always
  datasource:
    url: jdbc:mysql://localhost:3306/batch_processing
    username: root
    password: root
  jpa:
    hibernate:
      ddl-auto: update
    show-sql: true
    properties:
      hibernate:
        format_sql: true
Here there is no need of the controller since the batch is configured to run automatically when the application starts.
Conclusion
Thanks for reading our latest article on Spring Boot Tutorial: Spring Batch with practical usage.
You can get source code for this tutorial from our GitHub repository.
Happy Coding!!!!😊